 srcmini
Kivy是Python中与平台无关的GUI工具。由于它可以在Android, IOS, Linux和Windows等操作系统上运行。它基本上是用于开发Android应用程序, 但这并不意味着它不能在桌面应用程序上使用。
??Kivy教程–通过示例学习Kivy。
图像小部件:
图像小部件用于显示图像。要使用图像小部件, 你必须导入:
从kivy.uix.image导入图像, AsyncImage(使用.kv文件时不需要)
因为模块kivy.uix.image具有与图像相关的所有功能。
可以通过两种类型将图像加载到应用程序:
1)同步加载:从系统加载图像(必须从保存.py和.kv文件的文件夹中加载)2)异步加载:异步加载图像(例如, 从外部Web服务器加载)
注意:默认情况下, 图像居中并适合窗口小部件边界框。如果你不想这样做, 可以设置allow_stretch到True和keep_ratio为假。
Basic Approach to create multiple layout in one file:
1) import kivy
2) import kivyApp
3) import image
4) import BoxLayout
5) set minimum version(optional)
6) Create the Layout class
7) Create App class
8) Create .kv file:
          1) Add BoxLayout
          2) Add Label
          3) Add Image
          4) Resizing, Positioning etc of Image
9) return instance of the layout class
10) Run an instance of the class
因此, 在下面的代码中, 我们将说明如何加载同步和异步图像。还有如何用更多的东西来调整图像的大小, 位置, 标签等。
.py
文件–
## Sample Python application demonstrating the
## working with images in Kivy using .kv file

##################################################
# import kivy module
import kivy

# base Class of your App inherits from the App class.
# app:always refers to the instance of your application
from kivy.app import App

# this restrict the kivy version i.e
# below this kivy version you cannot
# use the app or software
kivy.require( '1.9.0' )

# BoxLayout arranges children in a vertical or horizontal box.
# or help to put the children at the desired location.
from kivy.uix.boxlayout import BoxLayout

# to change the kivy default settings we use this module config
from kivy.config import Config

# 0 being off 1 being on as in true /false
# you can use 0 or 1 && True or False
Config. set ( 'graphics' , 'resizable' , True )

# creating the root widget used in .kv file
class Imagekv(BoxLayout):
     '''
         no need to do anything here as
         we are building things in .kv file
     '''
     pass

# class in which name .kv file must be named My.kv.
class MyApp(App):
     # define build() function
     def build( self ):
         # returning the instance of Imagekv class
         return Imagekv()

# run the App
if __name__ = = '__main__' :
     MyApp().run()
.kv文件
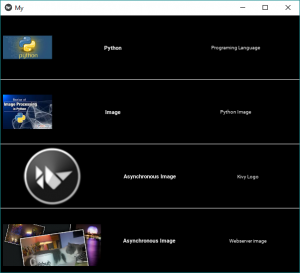
实施–
# How to use images in kivy using .kv

# root widget od Imagekv Calss
<Imagekv>:

     # Giving orentation to Box Layout
     orientation: 'vertical'

###############################################

     # Adding Box Layoyt
     BoxLayout:

         padding: 5

         # Adding image from the system
         Image:
             source: 'download.jpg'

             # Giving the size of image
             size_hint_x: 0.4

             # allow sterching of image
             allow_stretch: True

         # Giving Label to images
         Label:
             text: "Python"
             font_size: 11
             bold: True

         Label:
             text: "Programing Language"
             font_size: 10

###############################################

    # Drawing the line between the multiples
     Label:
         canvas.before:
             Color:
                 rgba: ( 1 , 1 , 1 , 1 )
             Rectangle:
                 size: self .size
                 pos: self .pos
         size_hint_y: None
         height: 1

################################################

     # Another Box Layout
     BoxLayout:
         padding: 5
         Image:
             source: "downloadimg.jpg"
             size_hint_x: 0.4
             allow_stretch: True

         Label:
             text: "Image"
             font_size: 11
             bold: True

         Label:
             text: "Python Image"
             font_size: 10

#############################################

     # Drawing the line between the multiples
     Label:
         canvas.before:
             Color:
                 rgba: ( 1 , 1 , 1 , 1 )
             Rectangle:
                 size: self .size
                 pos: self .pos
         size_hint_y: None
         height: 1

###############################################

     # Adding next Box Layout
     BoxLayout:
         padding: 5

         # To load an image asynchronously
         # (for example from an external webserver)
         AsyncImage:
             source: 'http://kivy.org/logos/kivy-logo-black-64.png'
             width: 100
             allow_stretch: True

         Label:
             text: " Asynchronous Image "
             font_size: 11
             bold: True

         Label:
             text: "Kivy Logo"
             font_size: 10

####################################################

     # Drawing the line between the multiples
     Label:
         canvas.before:
             Color:
                 rgba: ( 1 , 1 , 1 , 1 )
             Rectangle:
                 size: self .size
                 pos: self .pos
         size_hint_y: None
         height: 1

#####################################################

     # LAst Box Layout
     BoxLayout:
         padding: 5

         AsyncImage:
             size_hint_y: None
             source: 'http://kivy.org/slides/kivypictures-thumb.jpg'
             width: 100
             allow_stretch: True

         Label:
             text: "Asynchronous Image "
             font_size: 11
             bold: True

         Label:
             text: " Webserver image "
             font_size: 10
输出如下:
首先, 你的面试准备可通过以下方式增强你的数据结构概念:Python DS课程。
评论前必须登录!
注册