 srcmini
Kivy是Python中与平台无关的GUI工具。由于它可以在Android, IOS, Linux和Windows等操作系统上运行。它基本上是用于开发Android应用程序, 但这并不意味着它不能在桌面应用程序上使用。
??Kivy教程–通过示例学习Kivy。
线条画布
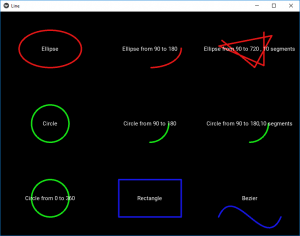
Line是一个顶点画布指令。它允许绘制通过点的线。此代码显示如何使用/绘制扩展线图, 例如圆形, 椭圆形, 矩形和Bezier等。
Basic Approach:

1) import kivy
2) import kivy App
3) import Gridlayout
4) import widget
5) set minimum version(optional)
6) Create as much as widget class as needed
7) create the App class
8) return the widget/layout etc class
9) Run an instance of the class
实施方法:
#Main.py
# kivy Lines Demo

# import kivy module
import kivy

# base Class of your App inherits from the App class.
# app:always refers to the instance of your application
from kivy.app import App


# The GridLayout arranges children in a matrix.
# It takes the available space and
# divides it into columns and rows, # then adds widgets to the resulting "cells".
from kivy.uix.gridlayout import GridLayout

# Widgets are elements of
# a graphical user interface that
# form part of the User Experience.
from kivy.uix.widget import Widget


##############################################
# Classes form Different types of line as  widgets

class LineEllipse1(Widget):
     pass

class LineEllipse2(Widget):
     pass

class LineEllipse3(Widget):
     pass

class LineCircle1(Widget):
     pass

class LineCircle2(Widget):
     pass

class LineCircle3(Widget):
     pass

class LineCircle4(Widget):
     pass

class LineRectangle(Widget):
     pass

class LineBezier(Widget):
     pass


# Create the App class
class LineApp(App):
     def build( self ):

         # Assign the number of coloumn, spacing and padding
         root = GridLayout(cols = 3 , padding = 50 , spacing = 100 )

         # Adding the widgets
         root.add_widget(LineEllipse1())
         root.add_widget(LineEllipse2())
         root.add_widget(LineEllipse3())
         root.add_widget(LineCircle1())
         root.add_widget(LineCircle2())
         root.add_widget(LineCircle3())
         root.add_widget(LineCircle4())
         root.add_widget(LineRectangle())
         root.add_widget(LineBezier())
         return root

# Run the App class
if __name__ = = '__main__' :
     LineApp().run()
Line.kv文件:
# Line.kv file of the code

# Creating Different types of Lines(or shapes through line)

###########################################

# Row 1:

# Ellipse(1st row 1st element)

<LineEllipse1>:

     # Creating Canvas
     canvas:
         Color:
             rgba: 1 , . 1 , . 1 , . 9
         # Ellipse Creation
         Line:
             width: 2.
             ellipse: ( self .x, self .y, self .width, self .height)

     # Label the figure
     Label:
         center: root.center
         text: 'Ellipse'


############################################

# Ellipse from 90 to 180((1st row 2nd element))

<LineEllipse2>:
     canvas:
         Color:
             rgba: 1 , . 1 , . 1 , . 9
         Line:
             width: 2.
             ellipse: ( self .x, self .y, self .width, self .height, 90 , 180 )
     Label:
         center: root.center
         text: 'Ellipse from 90 to 180'


############################################


# Ellipse from 90 to 720, 10 segments(1st row 3rd element)

<LineEllipse3>:
     canvas:
         Color:
             rgba: 1 , . 1 , . 1 , . 9
         Line:
             width: 2.
             ellipse: ( self .x, self .y, self .width, self .height, 90 , 720 , 10 )
     Label:
         center: root.center
         text: 'Ellipse from 90 to 720, 10 segments'
         halign: 'center'

############################################

# Circle(2nd row 1st element)
<LineCircle1>:
     canvas:
         Color:
             rgba: . 1 , 1 , . 1 , . 9
         Line:
             width: 2.
             circle:
                 ( self .center_x, self .center_y, min ( self .width, self .height)
                 /2 )
     Label:
         center: root.center
         text: 'Circle'

############################################

# Circle from 90 to 180(2nd row 2nd element)
<LineCircle2>:
     canvas:
         Color:
             rgba: . 1 , 1 , . 1 , . 9
         Line:
             width: 2.
             circle:
                 ( self .center_x, self .center_y, min ( self .width, self .height)
                 /2 , 90 , 180 )
     Label:
         center: root.center
         text: 'Circle from 90 to 180'

############################################
# Circle from 90 to 180, 10 segments(1st row 3rd element)
<LineCircle3>:
     canvas:
         Color:
             rgba: . 1 , 1 , . 1 , . 9
         Line:
             width: 2.
             circle:
                 ( self .center_x, self .center_y, min ( self .width, self .height)
                 /2 , 90 , 180 , 10 )
     Label:
         center: root.center
         text: 'Circle from 90 to 180, 10 segments'
         halign: 'center'

############################################

# Circle from 0 to 360 (3rd row 1st element)
<LineCircle4>:
     canvas:
         Color:
             rgba: . 1 , 1 , . 1 , . 9
         Line:
             width: 2.
             circle:
                 ( self .center_x, self .center_y, min ( self .width, self .height)
                 /2 , 0 , 360 )
     Label:
         center: root.center
         text: 'Circle from 0 to 360'
         halign: 'center'

############################################

# Rectangle (3rd row 2nd element)
<LineRectangle>:
     canvas:
         Color:
             rgba: . 1 , . 1 , 1 , . 9
         Line:
             width: 2.
             rectangle: ( self .x, self .y, self .width, self .height)
     Label:
         center: root.center
         text: 'Rectangle'

############################################

# Bezier (3rd row 3rd element)
<LineBezier>:
     canvas:
         Color:
             rgba: . 1 , . 1 , 1 , . 9
         Line:
             width: 2.
             bezier:
                 ( self .x, self .y, self .center_x - 40 , self .y + 100 , self .center_x + 40 , self .y - 100 , self .right, self .y)
     Label:
         center: root.center
         text: 'Bezier'
输出如下:
首先, 你的面试准备可通过以下方式增强你的数据结构概念:Python DS课程。
评论前必须登录!
注册