 srcmini
本文概述
计划程序是你在公司的软件产品上不容错过的组件。使用计划程序, 企业(或普通人)将能够计划和跟踪约会, 事件, 任务和其他事物。如我们的Top 5:Best所示, dhtmlx调度程序是最好的调度程序JavaScript库之一, 可让你在应用程序中实现此功能。 dhtmlxScheduler是类似Google的JS事件日历, 具有多种视图和功能。它具有干净的UI和可自定义的外观。
在本文中, 你将学习如何使用Symfony和dhtmlxscheduler在前端和后端创建自己的自定义事件日历(计划程序)。
要求
要创建自己的Scheduler, 你将需要在项目中准备以下库。我们将描述它们需要的内容, 如果你不能包括它们(显然很必要, 则不包括dhtmlx调度程序), 则可以编写自己的后备:
A. dhtmlx调度程序
你将需要dhtmlx调度程序库的副本(.zip文件)。该库提供2个版本, 开放源代码版本(标准版), 你可以通过阅读官方网站上的库文档自行使用;或付费版本(专业版), 在此版本中可获得支持和商业许可。
从源zip文件中, 你仅需要JavaScript代码, 因为后端将完全由Symfony实现。该调度程序非常灵活, 你可以按照自己的方式自定义许多内容, 建议你也阅读文档。你可以在此处下载任何提及的版本。
有了zip文件后, 首先需要创建一个目录来保存库。在本文中, 我们将在Symfony应用程序的/ web目录中创建库文件夹。因此, 源JavaScript将可在yourapplication / web / libraries / dhtmlx上访问。我们不会弄乱下载的zip文件的原始结构, 因此在这种情况下, 你将在dhtmlx中拥有文件夹代码库和示例, 可用于签出示例以稍后使调度程序besser运行。
B.Moment.js
Moment.js的JavaScript主文件需要在yourapplication / web / libraries / momentjs上可访问。如果你不想使用MomentJS库在需要的日期格式化我们的日期(第4步), 则可以通过使用以下代码替换getFormatedEvent来创建后备:
// Retrieve the format date method (that follows the given pattern) from the scheduler library
var formatDate = scheduler.date.date_to_str("%d-%m-%Y %H:%i:%s");

/**
 * Returns an Object with the desired structure of the server.
 *
 * @param {*} id
 * @param {*} useJavascriptDate
 */
function getFormatedEvent(id, useJavascriptDate){
    var event;

    // If id is already an event object, use it and don't search for it
    if(typeof(id) == "object"){
        event = id;
    }else{
        event = scheduler.getEvent(parseInt(id));
    }

    if(!event){
        console.error("The ID of the event doesn't exist: " + id);
        return false;
    }

    var start , end;

    if(useJavascriptDate){
        start = event.start_date;
        end = event.end_date;
    }else{
        start = formatDate(event.start_date);
        end = formatDate(event.end_date);
    }

    return {
        id: event.id, start_date : start, end_date : end, description : event.description, title : event.text
    };
}
C. jQuery或任何其他与自定义相关的AJAX库
我们将使用jQuery AJAX在视图中提交约会。另外, 你可以编写自己的纯XMLHttpRequest代码, 以使用JavaScript异步将数据提交到服务器, 或者如果你不想使用jQuery但需要其他库, 则minAjax非常有用, 并且与jQuery的工作方式相同。
1.实现预约实体
注意
如果你已经有一些用于”约会”的自定义表格设计, 请跳过此步骤, 并按照步骤2上的控制器结构进行操作。
使用调度程序, 你将能够在客户端以图形方式调度事件, 但是它们也需要存储在用户的某些数据库中。这可以通过客户端和服务器之间使用AJAX进行通信来实现。
此示例的目标是将一些约会类持久保存到数据库(MySql, MongoDB, CouchDB等)。然后, 你的第一项工作是为你的应用程序创建Appointment类。此类可以根据需要进行外观和操作, 因此可以添加任何有用的属性或方法。在此示例中, 我们的实体将从下表生成, 即约会。数据库上的约会表将具有5个字段, 即id(自动递增, 不为null), 标题(文本列), 描述(文本列), start_date(日期时间列)和end_date(日期时间列):
CREATE TABLE `YourExistentTable`.`appointments`
  (
     `id`          BIGINT NOT NULL auto_increment, `title`       VARCHAR(255) NOT NULL, `description` TEXT NULL, `start_date`  DATETIME NOT NULL, `end_date`    DATETIME NOT NULL, PRIMARY KEY (`id`)
  )
engine = innodb;
根据你的工作方式, 你可以按照以下过程手动或从数据库中生成orm文件和实体。如果要从现有数据库生成实体, 则现在可以运行以下命令来生成ORM文件:
php bin/console doctrine:mapping:import --force AppBundle yml这将为Appointment表生成ORM文件, 并在AppBundle / Resources / config / doctrine / Appointments.orm.yml中显示以下结果:
AppBundle\Entity\Appointments:
    type: entity
    table: appointments
    id:
        id:
            type: bigint
            nullable: false
            options:
                unsigned: false
            id: true
            generator:
                strategy: IDENTITY
    fields:
        title:
            type: string
            nullable: false
            length: 255
            options:
                fixed: false
        description:
            type: text
            nullable: true
            length: 65535
            options:
                fixed: false
        startDate:
            type: datetime
            nullable: false
            column: start_date
        endDate:
            type: datetime
            nullable: false
            column: end_date
    lifecycleCallbacks: {  }
然后, 在orm文件存在后, 你可以使用以下方法自动生成约会实体:
php bin/console doctrine:generate:entities AppBundle在AppBundle / Entity / Appointments处生成的实体如下所示:
<?php

namespace AppBundle\Entity;

/**
 * Appointments
 */
class Appointments
{
    /**
     * @var integer
     */
    private $id;

    /**
     * @var string
     */
    private $title;

    /**
     * @var string
     */
    private $description;

    /**
     * @var \DateTime
     */
    private $startDate;

    /**
     * @var \DateTime
     */
    private $endDate;


    /**
     * Get id
     *
     * @return integer
     */
    public function getId()
    {
        return $this->id;
    }

    /**
     * Set title
     *
     * @param string $title
     *
     * @return Appointments
     */
    public function setTitle($title)
    {
        $this->title = $title;

        return $this;
    }

    /**
     * Get title
     *
     * @return string
     */
    public function getTitle()
    {
        return $this->title;
    }

    /**
     * Set description
     *
     * @param string $description
     *
     * @return Appointments
     */
    public function setDescription($description)
    {
        $this->description = $description;

        return $this;
    }

    /**
     * Get description
     *
     * @return string
     */
    public function getDescription()
    {
        return $this->description;
    }

    /**
     * Set startDate
     *
     * @param \DateTime $startDate
     *
     * @return Appointments
     */
    public function setStartDate($startDate)
    {
        $this->startDate = $startDate;

        return $this;
    }

    /**
     * Get startDate
     *
     * @return \DateTime
     */
    public function getStartDate()
    {
        return $this->startDate;
    }

    /**
     * Set endDate
     *
     * @param \DateTime $endDate
     *
     * @return Appointments
     */
    public function setEndDate($endDate)
    {
        $this->endDate = $endDate;

        return $this;
    }

    /**
     * Get endDate
     *
     * @return \DateTime
     */
    public function getEndDate()
    {
        return $this->endDate;
    }
}
现在可以将约会实体保留在数据库中。如果没有将寄存器存储在数据库中的现有设计, 则可以根据需要随意修改字段。
2.实现调度程序控制器和路由
调度程序的控制器将只有4条路由。我们将定义的路由应该在项目的/ scheduler路由上是可访问的, 因此请修改Symfony项目的main routing.yml文件, 并注册另一个为调度程序处理路由的路由文件:
# Create route for scheduler in your app
app_scheduler:
    resource: "@AppBundle/Resources/config/routing/scheduler.yml"
    prefix:   /scheduler
请注意, 我们会将新的路由文件存储在主捆绑包的config / routing文件夹中。 scheduler.yml路由文件如下:
# app/config/routing.yml
scheduler_index:
    path:      /
    defaults:  { _controller: AppBundle:Scheduler:index }
    methods:  [GET]

scheduler_create:
    path:      /appointment-create
    defaults:  { _controller: AppBundle:Scheduler:create }
    methods:  [POST]

scheduler_update:
    path:      /appointment-update
    defaults:  { _controller: AppBundle:Scheduler:update }
    methods:  [POST]

scheduler_delete:
    path:      /appointment-delete
    defaults:  { _controller: AppBundle:Scheduler:delete }
    methods:  [DELETE]
每个路由都由位于AppBundle(我们现在将创建)中的Scheduler Controller中的函数处理。其中只有3个将通过AJAX用于创建, 删除和修改约会。索引路由(你的网站/调度程序)将在浏览器中呈现调度程序。
现在已经注册了路由, 你将需要创建用于处理路由的控制器以及每个路由上的逻辑。由于逻辑根据你处理实体的方式而有所不同, 因此以下控制器显示了如何通过与约会实体一起处理每个事件。所有响应均以JSON格式(索引除外)给出, 以提供有关操作状态的信息:
<?php

namespace AppBundle\Controller;

use Symfony\Bundle\FrameworkBundle\Controller\Controller;

// Include the used classes as JsonResponse and the Request object
use Symfony\Component\HttpFoundation\JsonResponse;
use Symfony\Component\HttpFoundation\Request;

// The entity of your Appointment
use AppBundle\Entity\Appointments as Appointment;

class SchedulerController extends Controller
{
    /**
     * View that renders the scheduler.
     *
     */
    public function indexAction()
    {
        // Retrieve entity manager
        $em = $this->getDoctrine()->getManager();

        // Get repository of appointments
        $repositoryAppointments = $em->getRepository("AppBundle:Appointments");

        // Note that you may want to filter the appointments that you want to send
        // by dates or something, otherwise you will send all the appointments to render
        $appointments = $repositoryAppointments->findAll();

        // Generate JSON structure from the appointments to render in the start scheduler.
        $formatedAppointments = $this->formatAppointmentsToJson($appointments);

        // Render scheduler
        return $this->render("default/scheduler.html.twig", [
            'appointments' => $formatedAppointments
        ]);
    }

    /**
     * Handle the creation of an appointment.
     *
     */
    public function createAction(Request $request){
        $em = $this->getDoctrine()->getManager();
        $repositoryAppointments = $em->getRepository("AppBundle:Appointments");

        // Use the same format used by Moment.js in the view
        $format = "d-m-Y H:i:s";

        // Create appointment entity and set fields values
        $appointment = new Appointment();
        $appointment->setTitle($request->request->get("title"));
        $appointment->setDescription($request->request->get("description"));
        $appointment->setStartDate(
            \DateTime::createFromFormat($format, $request->request->get("start_date"))
        );
        $appointment->setEndDate(
            \DateTime::createFromFormat($format, $request->request->get("end_date"))
        );

        // Create appointment
        $em->persist($appointment);
        $em->flush();

        return new JsonResponse(array(
            "status" => "success"
        ));
    }

    /**
     * Handle the update of the appointments.
     *
     */
    public function updateAction(Request $request){
        $em = $this->getDoctrine()->getManager();
        $repositoryAppointments = $em->getRepository("AppBundle:Appointments");

        $appointmentId = $request->request->get("id");

        $appointment = $repositoryAppointments->find($appointmentId);

        if(!$appointment){
            return new JsonResponse(array(
                "status" => "error", "message" => "The appointment to update $appointmentId doesn't exist."
            ));
        }

        // Use the same format used by Moment.js in the view
        $format = "d-m-Y H:i:s";

        // Update fields of the appointment
        $appointment->setTitle($request->request->get("title"));
        $appointment->setDescription($request->request->get("description"));
        $appointment->setStartDate(
            \DateTime::createFromFormat($format, $request->request->get("start_date"))
        );
        $appointment->setEndDate(
            \DateTime::createFromFormat($format, $request->request->get("end_date"))
        );

        // Update appointment
        $em->persist($appointment);
        $em->flush();

        return new JsonResponse(array(
            "status" => "success"
        ));
    }

    /**
     * Deletes an appointment from the database
     *
     */
    public function deleteAction(Request $request){
        $em = $this->getDoctrine()->getManager();
        $repositoryAppointments = $em->getRepository("AppBundle:Appointments");

        $appointmentId = $request->request->get("id");

        $appointment = $repositoryAppointments->find($appointmentId);

        if(!$appointment){
            return new JsonResponse(array(
                "status" => "error", "message" => "The given appointment $appointmentId doesn't exist."
            ));
        }

        // Remove appointment from database !
        $em->remove($appointment);
        $em->flush();

        return new JsonResponse(array(
            "status" => "success"
        ));
    }


    /**
     * Returns a JSON string from a group of appointments that will be rendered on the calendar.
     * You can use a serializer library if you want.
     *
     * The dates need to follow the format d-m-Y H:i e.g : "13-07-2017 09:00"
     *
     *
     * @param $appointments
     */
    private function formatAppointmentsToJson($appointments){
        $formatedAppointments = array();

        foreach($appointments as $appointment){
            array_push($formatedAppointments, array(
                "id" => $appointment->getId(), "description" => $appointment->getDescription(), // Is important to keep the start_date, end_date and text with the same key
                // for the JavaScript area
                // altough the getter could be different e.g:
                // "start_date" => $appointment->getBeginDate();
                "text" => $appointment->getTitle(), "start_date" => $appointment->getStartDate()->format("Y-m-d H:i"), "end_date" => $appointment->getEndDate()->format("Y-m-d H:i")
            ));
        }

        return json_encode($formatedAppointments);
    }
}
由于dhtmlx调度程序在事件中需要start_date, end_date和text键, 因此你需要在每个事件中提供它们, 这意味着你无法更改其名称。
3.实现布局和脚本结构
现在服务器端逻辑已准备就绪, 你可以继续创建应用程序的布局。在这种情况下, 我们将渲染全屏调度程序。
我们将在Twig(base.html.twig)中的布局中使用以下基本文件:
{# application/resources/views/base.html.twig #}
<!DOCTYPE html>
<html>
    <head>
        <meta charset="UTF-8" />
        <title>{% block title %}Welcome!{% endblock %}</title>
        {% block stylesheets %}{% endblock %}
    </head>
    <body>
        {% block body %}{% endblock %}
        {% block javascripts %}{% endblock %}
    </body>
</html>
由于你的项目可能会遵循其他模式, 因此请确保将我们将添加的内容包括在你各自的模块中。
然后, 按照控制器中的定义, 我们的scheduler.html.twig文件将位于目录app / resources / views / default中, 因此请确保在上述路径中创建该文件(或在控制器中进行更改)。调度程序的布局将如下所示:
{# default/scheduler.html.twig #}
{% extends "base.html.twig" %}
{% block stylesheets %}
<!-- Include the flat style of the scheduler -->
<link rel='stylesheet' type='text/css' href='{{ asset("libraries/dhtmlx/codebase/dhtmlxscheduler_flat.css") }}' charset="utf-8"/>
<!-- If you won't use full screen mode, ignore the following style -->
<style type="text/css" media="screen">
html, body{
margin:0px;
padding:0px;
height:100%;
overflow:hidden;
}
</style>
{% endblock %}
{% block body -%}
<div id="scheduler_element" class="dhx_cal_container" style='width:100%; height:100%;'>
<div class="dhx_cal_navline">
<div class="dhx_cal_prev_button"> </div>
<div class="dhx_cal_next_button"> </div>
<div class="dhx_cal_today_button"></div>
<div class="dhx_cal_date"></div>
<div class="dhx_cal_tab" name="day_tab" style="right:204px;"></div>
<div class="dhx_cal_tab" name="week_tab" style="right:140px;"></div>
<div class="dhx_cal_tab" name="month_tab" style="right:76px;"></div>
</div>
<div class="dhx_cal_header"></div>
<div class="dhx_cal_data"></div>
</div>
{% endblock %}
{% block javascripts %}
<!-- Include the scheduler library -->
<script src='{{ asset("libraries/dhtmlx/codebase/dhtmlxscheduler.js") }}' type='text/javascript' charset="utf-8"></script>
<!-- Include jQuery to handle AJAX Requests -->
<script src="https://cdnjs.cloudflare.com/ajax/libs/jquery/3.2.1/jquery.min.js"></script>
<!-- Include Momentjs to play with the dates -->
<script src="{{ asset("libraries/momentjs/moment.js") }}"></script>
<script>
// Expose the appointments globally by printing the JSON string with twig and the raw filter
// so they can be accesible by the schedulerScripts.js the controller
window.GLOBAL_APPOINTMENTS = {{ appointments|raw }};
// As the scheduler scripts will be in other files, the routes generated by twig
// should be exposed in the window too
window.GLOBAL_SCHEDULER_ROUTES = {
create: '{{ path("scheduler_create") }}', update: '{{ path("scheduler_update") }}', delete: '{{ path("scheduler_delete") }}'
};
</script>
<!-- Include the schedulerScripts that you will need to write in the next step -->
<script src='{{ asset("libraries/schedulerScripts.js") }}' type='text/javascript' charset="utf-8"></script>
{% endblock %}在样式表中, 它包括Scheduler的平面样式和一些规则, 以使其在全屏模式下看起来不错。然后, 在代码块主体, Scheduler所需的标记以及JavaScripts代码块中, 我们将按以下顺序包括库:dhtmlxscheduler, 用于AJAX的jQuery, 可轻松操纵日期的MomentJS。
原始脚本标签在窗口(全局)中声明2个变量, 即GLOBAL_APPOINTMENTS和GLOBAL_SCHEDULER_ROUTES。约会对象将索引视图中的约会(请参阅索引控制器以获取更多信息)以JSON格式存储(但在JS中解释为对象), 因此我们需要使用Twig的原始过滤器。路线对象存储Twig生成的路线, 这些路线将用于更新, 创建和删除约会。由于处理调度程序的逻辑将写在另一个JavaScript文件中, 因此我们不能在其中使用twig, 因此建议在可用twig的位置生成它们, 然后使用窗口访问它们。
现在, 我们将编写schedulerScripts.js文件的内容, 该文件将包含用于处理视图中的调度程序逻辑的代码。
4.编写客户端逻辑
对于我们的Scheduler, 我们将允许用户借助对话框(即dhtmlx Scheduler的默认Lightbox)在日历上创建约会。你首先要做的是通过修改调度程序的config对象来配置调度程序的默认行为。至少你需要提供xml_date格式, 其余的纯粹是可选的。
然后配置表单的各个部分以插入和编辑约会。在这种情况下, 因为我们只有2个字段, 即标题和描述, 所以标题将映射到Scheduler的默认文本字段。灯箱上必须存在默认的时间和文本字段, 时间会自动指定开始和结束字段。然后在DIV元素中以某种模式(日, 周或月)初始化调度程序, 并可选地指定调度程序应开始的日期。然后解析从索引控制器返回的事件(所有约会存储在window.GLOBAL_APPOINTMENTS数组中。最后, 你可以附加事件以处理用户对Scheduler的处理。
schedulerScripts.js的代码如下:
// 1. Configure Scheduler Basic Settings
scheduler.config.xml_date="%Y-%m-%d %H:%i";
scheduler.config.first_hour = 6;
scheduler.config.last_hour = 24;
scheduler.config.limit_time_select = true;
scheduler.config.details_on_create = true;
// Disable event edition with single click
scheduler.config.select = false;
scheduler.config.details_on_dblclick = true;
scheduler.config.max_month_events = 5;
scheduler.config.resize_month_events = true;

// 2. Configure Lightbox (form) sections
scheduler.config.lightbox.sections = [
    // If you have another field on your Appointment entity (e.g example_field column), you would add it like
    // {name:"Example Field", height:30, map_to:"example_field", type:"textarea"}, {name:"Title", height:30, map_to:"text", type:"textarea"}, {name:"Description", height:30, map_to:"description", type:"textarea"}, {name:"time", height:72, type:"time", map_to:"auto"}
];

// 3. Start calendar with custom settings
var initSettings = {
    // Element where the scheduler will be started
    elementId: "scheduler_element", // Date object where the scheduler should be started
    startDate: new Date(), // Start mode
    mode: "week"
};

scheduler.init(initSettings.elementId, initSettings.startDate , initSettings.mode);

// 4. Parse the initial (From index controller) appointments
scheduler.parse(window.GLOBAL_APPOINTMENTS, "json");

// 5. Function that formats the events to the expected format in the server side

/**
 * Returns an Object with the desired structure of the server.
 *
 * @param {*} id
 * @param {*} useJavascriptDate
 */
function getFormatedEvent(id, useJavascriptDate){
    var event;

    // If id is already an event object, use it and don't search for it
    if(typeof(id) == "object"){
        event = id;
    }else{
        event = scheduler.getEvent(parseInt(id));
    }

    if(!event){
        console.error("The ID of the event doesn't exist: " + id);
        return false;
    }

    var start , end;

    if(useJavascriptDate){
        start = event.start_date;
        end = event.end_date;
    }else{
        start = moment(event.start_date).format('DD-MM-YYYY HH:mm:ss');
        end = moment(event.end_date).format('DD-MM-YYYY HH:mm:ss');
    }

    return {
        id: event.id, start_date : start, end_date : end, description : event.description, title : event.text
    };
}

// 6. Attach Event Handlers !

/**
 * Handle the CREATE scheduler event
 */
scheduler.attachEvent("onEventAdded", function(id, ev){
    var schedulerState = scheduler.getState();

    $.ajax({
        url:  window.GLOBAL_SCHEDULER_ROUTES.create, data: getFormatedEvent(ev), dataType: "json", type: "POST", success: function(response){
            // Very important:
            // Update the ID of the scheduler appointment with the ID of the database
            // so we can edit the same appointment now !

            scheduler.changeEventId(ev.id , response.id);

            alert('The appointment '+ev.text+ " has been succesfully created");
        }, error:function(error){
            alert('Error: The appointment '+ev.text+' couldnt be created');
            console.log(error);
        }
    });
});

/**
 * Handle the UPDATE event of the scheduler on all possible cases (drag and drop, resize etc..)
 *
 */
scheduler.attachEvent("onEventChanged", function(id, ev){
    $.ajax({
        url:  window.GLOBAL_SCHEDULER_ROUTES.update, data: getFormatedEvent(ev), dataType: "json", type: "POST", success: function(response){
            if(response.status == "success"){
                alert("Event succesfully updated !");
            }
        }, error: function(err){
            alert("Error: Cannot save changes");
            console.error(err);
        }
    });

    return true;
});

/**
 * Handle the DELETE appointment event
 */
scheduler.attachEvent("onConfirmedBeforeEventDelete", function(id, ev){
    $.ajax({
        url: window.GLOBAL_SCHEDULER_ROUTES.delete, data:{
            id: id
        }, dataType: "json", type: "DELETE", success: function(response){
            if(response.status == "success"){
                if(!ev.willDeleted){
                    alert("Appointment succesfully deleted");
                }
            }else if(response.status == "error"){
                alert("Error: Cannot delete appointment");
            }
        }, error:function(error){
            alert("Error: Cannot delete appointment: " + ev.text);
            console.log(error);
        }
    });

    return true;
});


/**
 * Edit event with the right click too
 *
 * @param {type} id
 * @param {type} ev
 * @returns {Boolean}
 */
scheduler.attachEvent("onContextMenu", function (id, e){
    scheduler.showLightbox(id);
    e.preventDefault();
});
最后保存更改, 访问项目的URL http:// yourproject / scheduler, 你现在可以测试调度程序了。作为最终建议, 请查看dhtmlx调度程序的文档以发现更多很棒的实用程序, 这些实用程序将使你能够为客户创建最大的调度程序应用程序。
在约会表单中显示来自存储库的数据
根据项目的结构, 你的约会将不仅仅是标题, 描述和时间, 而约会的类型可能取决于另一个表(外键)的值。在下面的示例中, 我们的约会表将在列类别中具有一个ManyToOne关系, 其中一个表即类别, 其结构如下所示:
AppBundle\Entity\Categories:
    type: entity
    table: categories
    id:
        id:
            type: bigint
            nullable: false
            options:
                unsigned: false
            id: true
            generator:
                strategy: IDENTITY
    fields:
        name:
            type: string
            nullable: false
            length: 255
            options:
                fixed: false
    lifecycleCallbacks: {  }
类别表的orm文件存在后, 你可以使用以下方法自动生成类别实体:
php bin/console doctrine:generate:entities AppBundle在AppBundle / Entity / Categories中生成的实体如下所示:
<?php
// AppBundle\Entity\Categories.php

namespace AppBundle\Entity;

/**
 * Categories
 */
class Categories
{
    /**
     * @var integer
     */
    private $id;

    /**
     * @var string
     */
    private $name;


    /**
     * Get id
     *
     * @return integer
     */
    public function getId()
    {
        return $this->id;
    }

    /**
     * Set name
     *
     * @param string $name
     *
     * @return Categories
     */
    public function setName($name)
    {
        $this->name = $name;

        return $this;
    }

    /**
     * Get name
     *
     * @return string
     */
    public function getName()
    {
        return $this->name;
    }
}
现在, 你有了一个新的存储库, 可以使用标识的AppBundle:Categories访问。通过将约会表类别中的新字段配置为与另一个表具有ManyToOne关系, 约会表的原始ORM文件显然也会更改:
AppBundle\Entity\Appointments:
    type: entity
    table: appointments
    indexes:
        category:
            columns:
                - category
    id:
        id:
            type: bigint
            nullable: false
            options:
                unsigned: false
            id: true
            generator:
                strategy: IDENTITY
    fields:
        title:
            type: string
            nullable: false
            length: 255
            options:
                fixed: false
        description:
            type: text
            nullable: true
            length: 65535
            options:
                fixed: false
        startDate:
            type: datetime
            nullable: false
            column: start_date
        endDate:
            type: datetime
            nullable: false
            column: end_date
    manyToOne:
        category:
            targetEntity: Categories
            cascade: {  }
            fetch: LAZY
            mappedBy: null
            inversedBy: null
            joinColumns:
                category:
                    referencedColumnName: id
            orphanRemoval: false
    lifecycleCallbacks: {  }
如果再次生成该实体, 它将添加2个新方法:
// project/AppBundle/Entity/Appointments.php

/**
    * @var \AppBundle\Entity\Categories
    */
private $category;


/**
    * Set category
    *
    * @param \AppBundle\Entity\Categories $category
    *
    * @return Appointments
    */
public function setCategory(\AppBundle\Entity\Categories $category = null)
{
    $this->category = $category;

    return $this;
}

/**
    * Get category
    *
    * @return \AppBundle\Entity\Categories
    */
public function getCategory()
{
    return $this->category;
}
因此, 现在你可以在后端的约会实体上插入新字段。
由于我们的表单不是纯粹的symfony表单, 而是调度程序库使用JavaScript创建的”表单”, 因此, 如果要添加选择输入以列出数据库中所有类别的行, 以便你的用户可以选择约会的类别, 你将需要使用与约会相同的方式, 将Categories存储库中的行转换为JSON, 以便可由调度程序处理。
在你的Scheduler Controller中, 创建一个新方法, 将你的Categories格式化为JSON:
/**
    * Returns a JSON string from data of a repository. The structure may vary according to the
    * complexity of your forms.
    *
    * @param $categories
    */
private function formatCategoriesToJson($categories){
    $formatedCategories = array();

    foreach($categories as $categorie){
        array_push($formatedCategories, array(
            // Important to set an object with the 2 following properties !
            "key" => $categorie->getId(), "label" => $categorie->getName()
        ));
    }

    return json_encode($formatedCategories);
}
发送带有结构键和标签的对象很重要, 仅此而已。然后, 你需要修改呈现调度程序的indexAction, 在这里, 将Categories存储库的数据中的JSON结构作为变量发送给twig, 即category:
/**
 * View that renders the scheduler.
 *
 */
public function indexAction()
{
    // Retrieve entity manager
    $em = $this->getDoctrine()->getManager();

    // Get repository of appointments
    $repositoryAppointments = $em->getRepository("AppBundle:Appointments");

    // Get repository of categories
    $repositoryCategories = $em->getRepository("AppBundle:Categories");

    // Note that you may want to filter the appointments that you want to send
    // by dates or something, otherwise you will send all the appointments to render
    $appointments = $repositoryAppointments->findAll();

    // Generate JSON structure from the appointments to render in the start scheduler.
    $formatedAppointments = $this->formatAppointmentsToJson($appointments);

    // Retrieve the data from the repository categories
    $categories = $repositoryCategories->findAll();

    // Generate JSON structure from the data of the repository (in this case the categories)
    // so they can be rendered inside a select on the lightbox
    $formatedCategories = $this->formatCategoriesToJson($categories);

    // Render scheduler
    return $this->render("default/scheduler.html.twig", [
        'appointments' => $formatedAppointments, 'categories' => $formatedCategories
    ]);
}
现在Twig可以将字符串作为字符串访问类别, 但是对于JavaScript而言尚不可用, 因此你需要在Twig视图中全局公开它, 以便schedulerScripts文件可以访问该类别, 在这种情况下, 我们将通过窗口进行操作。 GLOBAL_CATEGORIES:
{% block javascripts %}
    <!-- Include the scheduler library -->
    <script src='{{ asset("libraries/dhtmlx/codebase/dhtmlxscheduler.js") }}' type='text/javascript' charset="utf-8"></script>

    <!-- Include jQuery to handle AJAX Requests -->
    <script src="https://cdnjs.cloudflare.com/ajax/libs/jquery/3.2.1/jquery.min.js"></script>

    <!-- Include Momentjs to play with the dates -->
    <script src="{{ asset("libraries/momentjs/moment.js") }}"></script>

    <script>
        // Expose the appointments globally by printing the JSON string with twig and the raw filter
        // so they can be accesible by the schedulerScripts.js the controller
        window.GLOBAL_APPOINTMENTS = {{ appointments|raw }};

        // As the scheduler scripts will be in other files, the routes generated by twig
        // should be exposed in the window too
        window.GLOBAL_SCHEDULER_ROUTES = {
            create: '{{ path("scheduler_create") }}', update: '{{ path("scheduler_update") }}', delete: '{{ path("scheduler_delete") }}'
        };

        // Important:
        // Expose the categories of the Appointments so they can be shown in the select
        window.GLOBAL_CATEGORIES = {{ categories|raw }};
    </script>

    <!-- Include the schedulerScripts that you will need to write in the next step -->
    <script src='{{ asset("libraries/schedulerScripts.js") }}' type='text/javascript' charset="utf-8"></script>
{% endblock %}
现在, 需要在日历中以约会的形式呈现category对象, 这意味着你需要修改schedulerScripts.js文件并修改定义灯箱部分的步骤2:
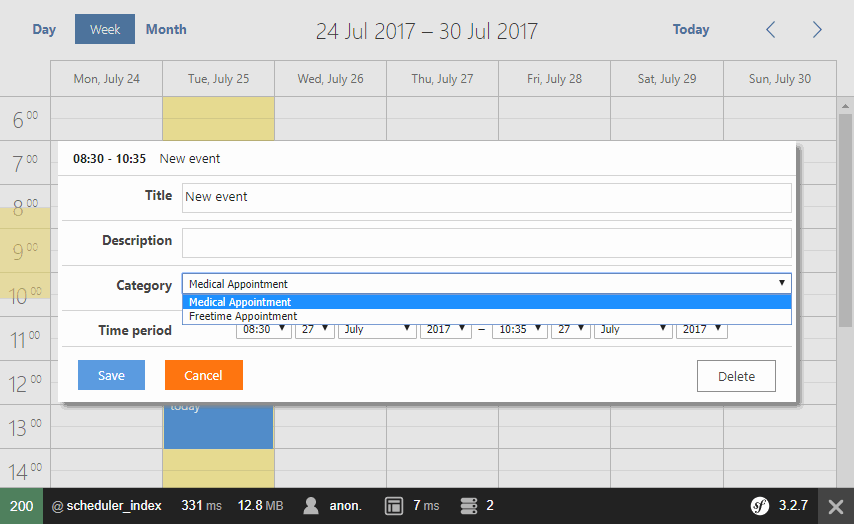
// 2. Configure Lightbox (form) sections
scheduler.config.lightbox.sections = [
    // If you have another field on your Appointment entity (e.g example_field column), you would add it like
    // {name:"Example Field", height:30, map_to:"example_field", type:"textarea"}, {name:"Title", height:30, map_to:"text", type:"textarea"}, {name:"Description", height:30, map_to:"description", type:"textarea"}, // Add a select that allow you to select the category of the appointment according to a table
    // "categories" from the database :)
    {name:"Category", options: window.GLOBAL_CATEGORIES , map_to: "category", type: "select", height:30 }, // Add the time field
    {name:"time", height:72, type:"time", map_to:"auto"}, ];
请注意, map_to属性将具有此值的事件映射为category属性, 该属性存储一个简单数字, 该数字指示正在使用的类别。你还需要修改getFormatedEvent函数以将类别作为属性发送, 否则在你修改或更新约会时将不会发送此字段:
/**
 * Returns an Object with the desired structure of the server.
 *
 * @param {*} id
 * @param {*} useJavascriptDate
 */
function getFormatedEvent(id, useJavascriptDate){
    var event;

    // If id is already an event object, use it and don't search for it
    if(typeof(id) == "object"){
        event = id;
    }else{
        event = scheduler.getEvent(parseInt(id));
    }

    if(!event){
        console.error("The ID of the event doesn't exist: " + id);
        return false;
    }

    var start , end;

    if(useJavascriptDate){
        start = event.start_date;
        end = event.end_date;
    }else{
        start = formatDate(event.start_date);
        end = formatDate(event.end_date);
    }

    return {
        id: event.id, start_date : start, end_date : end, description : event.description, title : event.text, // Important add the category ID
        category: event.category
    };
}
最后, 你需要处理后端的事件(创建和更新), 以便它们可以成为类别类型的对象, 并且可以保留约会实体:
注意
此修改也需要在updateAction中进行。
/**
 * Handle the creation of an appointment.
 *
 */
public function createAction(Request $request){
    $em = $this->getDoctrine()->getManager();
    $repositoryAppointments = $em->getRepository("AppBundle:Appointments");


    // Use the same format used by Moment.js in the view
    $format = "d-m-Y H:i:s";

    // Create appointment entity and set fields values
    $appointment = new Appointment();
    $appointment->setTitle($request->request->get("title"));
    $appointment->setDescription($request->request->get("description"));
    $appointment->setStartDate(
        \DateTime::createFromFormat($format, $request->request->get("start_date"))
    );
    $appointment->setEndDate(
        \DateTime::createFromFormat($format, $request->request->get("end_date"))
    );

    // Don't forget to update the create or update controller with the new field
    $repositoryCategories = $em->getRepository("AppBundle:Categories");

    // Search in the repository for a category object with the given ID and
    // set it as value !
    $appointment->setCategory(
        $repositoryCategories->find(
            $request->request->get("category")
        )
    );

    // Create appointment
    $em->persist($appointment);
    $em->flush();

    return new JsonResponse(array(
        "status" => "success"
    ));
}
你可以检查类别是否存在, 以防止出现任何错误。现在, 你的调度程序将具有一个选择组件, 该组件允许用户选择约会的类别:
注意
在我们的数据库中, 类别表仅包含2行, 即医疗约会和空闲时间约会。
编码愉快!
评论前必须登录!
注册