 srcmini
本文概述
在Ubuntu 18.x上安装和设置Sedy的分步指南
当你可以每月以25美元左右的价格发送10万封电子邮件时, 为什么还要每月花费数百美元呢?

如你所见, 如果你使用Sendy发送约100, 000封电子邮件, 则每月费用为10.02美元。你觉得我为什么说25美元吗?
干得好…
Sendy是一个自托管的电子邮件营销软件, 可以安装在VPS或Cloud服务器上。它利用AWS SES以便宜得多的价格发送电子邮件。你需要一次性支付59美元才能购买Sendy软件。正如我提到的, 你需要将其安装在服务器上, 该服务器通常每月花费约10美元。
因此, 如果你进行数学计算, 则每月花费不到25美元, 其中包括Sendy一次性付款, Cloud VM和Amazon SES。
不只是DigitalOcean, 你还可以将其安装在任何其他云平台上。 Sendy不是资源密集型软件, 因此入门级服务器(1 CPU / 1-2GB RAM)应该可以。
这里有一些选择。
| 平台 | Cost (monthly) |
| Kamatero | $9 |
| Linode | $10 |
| A2托管VPS | $10 |
到目前为止, 你知道定价的好处。让我们看一下它的一些功能。
- 漂亮的仪表板–基于Web的应用程序, 你可以在其中管理整个新闻通讯的操作。你会觉得自己正在使用基于SaaS的营销电子邮件平台。
- 多品牌–在一个帐户中管理多个品牌–非常适合数字代理商。
- 细分–在列表中细分你的客户和受众
- 自动回复–自动化你的营销电子邮件
- 弹跳处理–保持列表清洁
- 洞察力-了解广告系列的效果-可视化每个数据(点击, 退回, 退订等)
- GDPR准备就绪
- 启用两因素身份验证以提高安全性
如果你使用的是WordPress, 则Sendy有一个简单的小部件可以收集电子邮件。另外, 你可以使用Thrive Leads与Sendy集成以更快地收集电子邮件。
注意:你应该熟悉基本的Linux管理才能登录和安装软件。不用担心, 你可以在Fiverr上聘请专业人士为你完成任务。
让我们开始吧…
以下, 我将在Google Cloud VM上使用Ubuntu 18.04来安装MariaDB, Apache, PHP和Sendy。我将在一个名为sendy.geekflare.com的子域上进行设置
创建AWS IAM凭证
首先, 我们需要在AWS上创建IAM凭证, 下一步将需要它。我假设你已经拥有AWS帐户(如果没有), 可以在这里注册。
- 创建帐户并登录后, 转到” IAM用户”
- 点击添加用户, 然后输入用户名, 然后选择访问类型为程序化
- 在”直接附加现有策略”下, 键入sesf和snsf以选择策略
- 复制访问密钥ID和秘密访问密钥
你还可以按照视频中的说明进行操作。
不要与任何人共享访问权限和密钥。保持安全!
安装Sendy
- 登录Ubuntu服务器
- 安装Apache HTTP
apt-get install apache2- 启用mod_rewrite
a2enmod rewrite- 安装PHP-FPM和所需的库
apt-get install php-fpm libapache2-mod-php php-mysql php-curl php-xml- 安装MariaDB
apt-get install mariadb-server mariadb-client让我们运行安全脚本来强化SQL。运行以下命令并设置root密码。按Y键查看所有选项。
mysql_secure_installation例如:
[email protected]:/var/www/html# mysql_secure_installation

NOTE: RUNNING ALL PARTS OF THIS SCRIPT IS RECOMMENDED FOR ALL MariaDB
      SERVERS IN PRODUCTION USE!  PLEASE READ EACH STEP CAREFULLY!

In order to log into MariaDB to secure it, we'll need the current
password for the root user.  If you've just installed MariaDB, and
you haven't set the root password yet, the password will be blank, so you should just press enter here.

Enter current password for root (enter for none):
OK, successfully used password, moving on...

Setting the root password ensures that nobody can log into the MariaDB
root user without the proper authorisation.

Set root password? [Y/n]
New password:
Re-enter new password:
Password updated successfully!
Reloading privilege tables..
 ... Success!


By default, a MariaDB installation has an anonymous user, allowing anyone
to log into MariaDB without having to have a user account created for
them.  This is intended only for testing, and to make the installation
go a bit smoother.  You should remove them before moving into a
production environment.

Remove anonymous users? [Y/n] y
 ... Success!

Normally, root should only be allowed to connect from 'localhost'.  This
ensures that someone cannot guess at the root password from the network.

Disallow root login remotely? [Y/n]
 ... Success!

By default, MariaDB comes with a database named 'test' that anyone can
access.  This is also intended only for testing, and should be removed
before moving into a production environment.

Remove test database and access to it? [Y/n]
 - Dropping test database...
 ... Success!
 - Removing privileges on test database...
 ... Success!

Reloading the privilege tables will ensure that all changes made so far
will take effect immediately.

Reload privilege tables now? [Y/n]
 ... Success!

Cleaning up...

All done!  If you've completed all of the above steps, your MariaDB
installation should now be secure.

Thanks for using MariaDB!
[email protected]:/var/www/html#- 让我们创建一个数据库。登录到MySQL, 它将提示你输入在上一步中定义的密码。
mysql -u root -p- 它将带你到MariaDB提示符, 我们将在其中创建一个名为sendy的数据库。
create database sendy;- 授予权限
GRANT ALL ON sendy.* TO 'sendy'@'localhost' IDENTIFIED BY 'password';注意:将密码更改为一些复杂的密码
是时候上传Sendy软件了。购买时, 你会收到一封包含下载链接和许可证密钥的电子邮件。你需要将下载的软件上载到服务器。
- 转到Apache根目录
cd /var/www/html- 将上传的Sendy软件移到此处并解压缩文件
unzip sendy-4.0.1.zip- 它将创建一个新文件夹” sendy”, 你需要在其中更新config.php。
- 转到包含文件夹并更新config.php
cd includes
vi config.php
如你所见, 你需要更新五个参数(APP_PATH, dbHost, dbUser, dbPass, dbName)
到现在为止还挺好?让我们快速重新启动所有必要的软件。
service apache2 restart
service php7.2-fpm restart
service mysql restart
所有准备工作已经完成, 并且安装了Sendy的时间到了。在此之前, 让我们通过访问compatible.php文件来确保服务器具有所有必需的库
https://sub.domain.com/sendy/_compatibility.php?i=1你应该看到它们全部为绿色。

太好了, 让我们开始安装…
- 使用/ sendy访问URL
- 输入所有信息, 然后单击立即安装。

- 这将花费几秒钟, 你将获得成功确认。
你还将收到来自AWS的电子邮件, 以确认该电子邮件。完成后, 登录到Sendy。

这表明Sendy已成功安装并可以使用。但是, 等等, 别走..还有更多。
增加AWS SES配额
如果查看前面的屏幕截图, 你会注意到有关以红色文本发送电子邮件限制的信息。默认情况下, AWS允许每天发送200封电子邮件, 这在许多情况下可能还不够。要增加配额, 请转到服务限制增加请求并提交。
注意:你需要选择与Sendy连接的区域相同的区域。默认情况下为N. Virginia。要进行验证, 请转至Sendy仪表板>> AWS SES区域上的设置
这不是即时的, 因此你必须等待几个小时才能提高发送限制。 AWS会通知你。
验证域
为了更好地发送电子邮件, 你应该考虑在AWS SES上验证域。
- 转到AWS SES(同样, 请确保你与Sendy处于同一区域)
- 点击左侧栏中的域>>验证新域
- 输入域或子域
- 选择生成DKIM设置, 然后单击验证此域
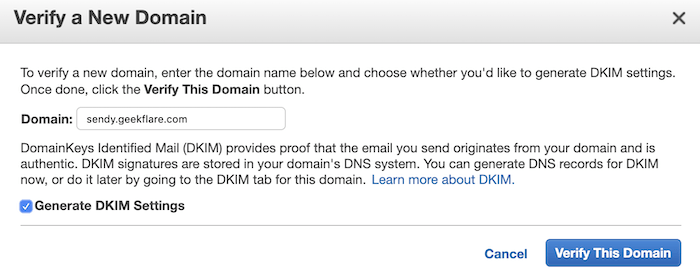
- 它将提示你需要通过域注册商为域配置的域验证记录。
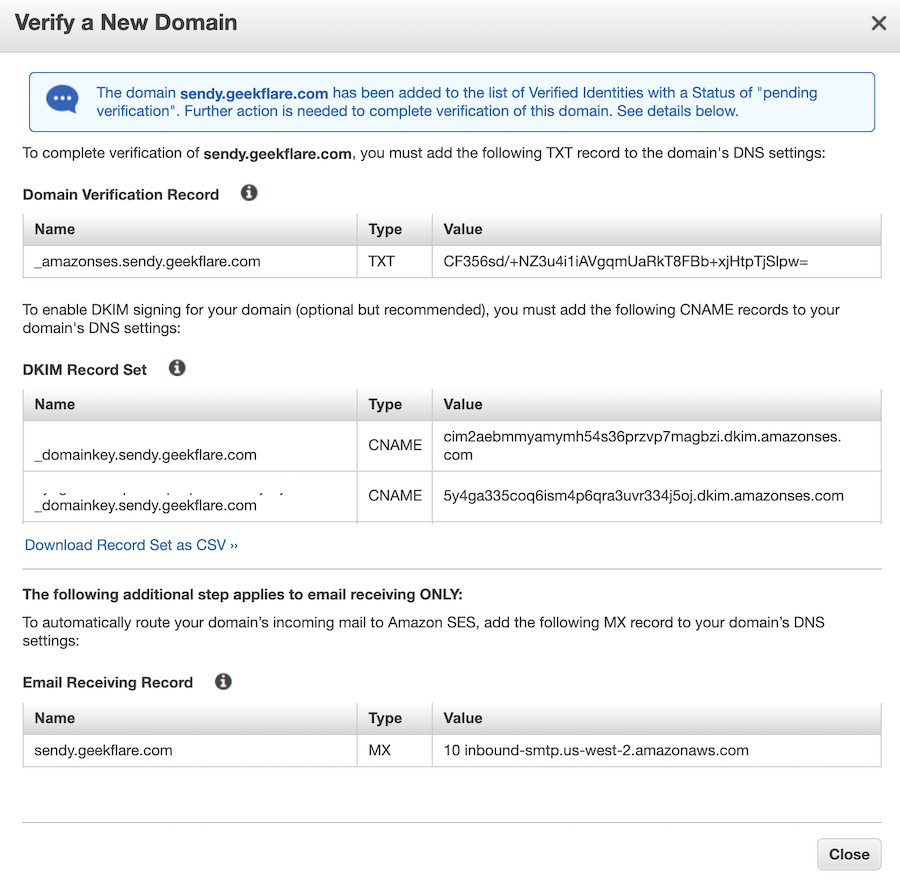
添加TXT和CNAME记录后, 最多可能需要72个小时才能对其进行验证。完成后, 你将在验证, DKIM和启用状态下看到所有绿色。

接下来, 验证将用于发送新闻稿的电子邮件。
- 点击左侧栏中的电子邮件地址>>验证新的电子邮件地址
你会收到一封验证电子邮件, 其中包含你提供的电子邮件地址。确认后, 你应该看到状态为已验证。
现在, 你可以很好地使用Sendy!

登录到Sendy并创建品牌, 导入列表(如果已有的话), 与潜在客户转化以及你想做的所有事情集成。
总结
设置Sendy需要一点时间, 但值得。如果你的订户列表很大, 则可以每年节省$$$$。
评论前必须登录!
注册