 srcmini
Kivy是Python中与平台无关的GUI工具。由于它可以在Android, IOS, Linux和Windows等操作系统上运行。它基本上是用于开发Android应用程序, 但这并不意味着它不能在桌面应用程序上使用。
??Kivy教程–通过示例学习Kivy。
弹出窗口小部件:
- 弹出窗口小部件用于创建弹出窗口。默认情况下, 弹出窗口将覆盖整个”父”窗口。创建弹出窗口时, 必须至少设置Popup.title和Popup.content。
- 当我们必须向用户传达某些明显的消息时, 将使用弹出对话框。通过状态栏发送给用户的消息以及需要重点告知的特定消息仍然可以通过弹出对话框来完成。
- 请记住, 小部件的默认大小为size_hint =(1, 1)。
- 如果你不希望弹出窗口显示在全屏上, 则必须给出小于1的大小提示(例如size_hint =(。8, .8)), 或者停用size_hint并使用固定大小属性。
要使用弹出窗口, 你必须导入:
from kivy.uix.popup import Popup注意:弹出窗口是一个特殊的小部件。请勿尝试将其作为子级添加到任何其他小部件中。如果这样做, 将像对待普通小部件一样处理Popup, 并且不会将其隐藏在后台创建。
Basic Approach :

1) import kivy
2) import kivyApp
3) import Label
4) import button
5) import Gridlayout
6) import popup
7) Set minimum version(optional)
8) create App class
9) return Layout/widget/Class(according to requirement)
10) In the App class create the popup
11) Run an instance of the class
代码1:
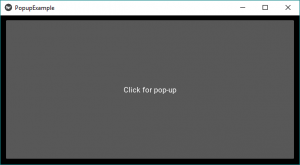
在第一个代码中, 弹出窗口将覆盖整个”父”窗口。
# Kivy example for the Popup widget

# Program to Show how to create a switch
# import kivy module
import kivy

# base Class of your App inherits from the App class.
# app:always refers to the instance of your application
from kivy.app import App

# this restrict the kivy version i.e
# below this kivy version you cannot
# use the app or software
kivy.require( '1.9.0' )

# The Button is a Label with associated actions
# that is triggered when the button
# is pressed (or released after a click/touch).
from kivy.uix.button import Button


# The GridLayout arranges children in a matrix.
# It takes the available space and
# divides it into columns and rows, # then adds widgets to the resulting "cells".
from kivy.uix.gridlayout import GridLayout

# Popup widget is used to create popups.
# By default, the popup will cover
# the whole "parent" window.
# When you are creating a popup, # you must at least set a Popup.title and Popup.content.
from kivy.uix.popup import Popup

# The Label widget is for rendering text.
from kivy.uix.label import Label

# to change the kivy default settings we use this module config
from kivy.config import Config

# 0 being off 1 being on as in true /false
# you can use 0 or 1 && True or False
Config. set ( 'graphics' , 'resizable' , True )

# Make an app by deriving from the kivy provided app class
class PopupExample(App):
     # override the build method and return the root widget of this App

     def build( self ):
         # Define a grid layout for this App
         self .layout = GridLayout(cols = 1 , padding = 10 )


         # Add a button
         self .button = Button(text = "Click for pop-up" )
         self .layout.add_widget( self .button)

         # Attach a callback for the button press event
         self .button.bind(on_press = self .onButtonPress)

         return self .layout

     # On button press - Create a popup dialog with a label and a close button
     def onButtonPress( self , button):

         layout = GridLayout(cols = 1 , padding = 10 )

         popupLabel = Label(text = "Click for pop-up" )
         closeButton = Button(text = "Close the pop-up" )

         layout.add_widget(popupLabel)
         layout.add_widget(closeButton)

         # Instantiate the modal popup and display
         popup = Popup(title = 'Demo Popup' , content = layout)
         popup. open ()

         # Attach close button press with popup.dismiss action
         closeButton.bind(on_press = popup.dismiss)

# Run the app
if __name__ = = '__main__' :
     PopupExample().run()
输出如下:
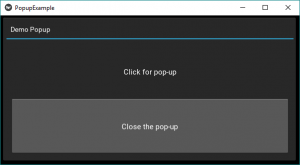
单击屏幕时, 弹出窗口将如下所示:
单击关闭弹出窗口时, 它将关闭。
代码2:
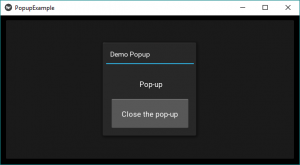
在第二个代码中, 当我们使用size_hint尺寸, 我们可以相应地给出尺寸。在此添加一些内容, 如下面的第75行代码所示。
# Kivy example for the Popup widget

# Program to Show how to create a switch
# import kivy module
import kivy

# base Class of your App inherits from the App class.
# app:always refers to the instance of your application
from kivy.app import App

# this restrict the kivy version i.e
# below this kivy version you cannot
# use the app or software
kivy.require( '1.9.0' )

# The Button is a Label with associated actions
# that is triggered when the button
# is pressed (or released after a click/touch).
from kivy.uix.button import Button


# The GridLayout arranges children in a matrix.
# It takes the available space and
# divides it into columns and rows, # then adds widgets to the resulting "cells".
from kivy.uix.gridlayout import GridLayout

# Popup widget is used to create popups.
# By default, the popup will cover
# the whole "parent" window.
# When you are creating a popup, # you must at least set a Popup.title and Popup.content.
from kivy.uix.popup import Popup

# The Label widget is for rendering text.
from kivy.uix.label import Label

# to change the kivy default settings we use this module config
from kivy.config import Config

# 0 being off 1 being on as in true /false
# you can use 0 or 1 && True or False
Config. set ( 'graphics' , 'resizable' , True )

# Make an app by deriving from the kivy provided app class
class PopupExample(App):
     # override the build method and return the root widget of this App

     def build( self ):
         # Define a grid layout for this App
         self .layout = GridLayout(cols = 1 , padding = 10 )


         # Add a button
         self .button = Button(text = "Click for pop-up" )
         self .layout.add_widget( self .button)

         # Attach a callback for the button press event
         self .button.bind(on_press = self .onButtonPress)

         return self .layout

     # On button press - Create a popup dialog with a label and a close button
     def onButtonPress( self , button):

         layout = GridLayout(cols = 1 , padding = 10 )

         popupLabel = Label(text = "Click for pop-up" )
         closeButton = Button(text = "Close the pop-up" )

         layout.add_widget(popupLabel)
         layout.add_widget(closeButton)

         # Instantiate the modal popup and display
         popup = Popup(title = 'Demo Popup' , content = layout, size_hint = ( None , None ), size = ( 200 , 200 ))
         popup. open ()

         # Attach close button press with popup.dismiss action
         closeButton.bind(on_press = popup.dismiss)

# Run the app
if __name__ = = '__main__' :
     PopupExample().run()
输出如下:
弹出窗口的大小将小于窗口的大小。
参考:https://kivy.org/doc/stable/api-kivy.uix.popup.html
首先, 你的面试准备可通过以下方式增强你的数据结构概念:Python DS课程。
评论前必须登录!
注册