 srcmini
在本节中,我们将学习创建Twitter生产者。
创建Twitter生产者基本上需要三个步骤:
- 创建一个Twitter客户端。
- 创建生产者
- 发送推文
步骤1:按照包命名约定规则创建一个新的Java包。然后,在其中创建一个Java类,说“ tweetproducer.java”。
步骤2:通过为其创建一个twitter客户端来创建一个方法。现在,将Quickstart代码从“ github twitter java”复制到twitter客户端方法,如下所示:
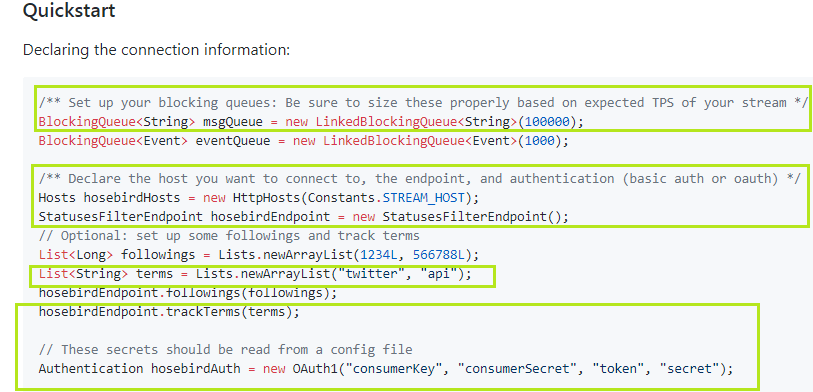
将其粘贴到新创建的方法中。此代码将在客户端和hbc主机之间创建连接。当队列为空或已满时,BlockingQueue将停止客户端使消息出队或入队。当我们使用hbc-core时,我们只需要msgQueue。此外,我们将遵守条款,而不是人民。因此,仅复制突出显示的代码。
现在,将连接代码下方给出的“创建客户端”代码复制为:
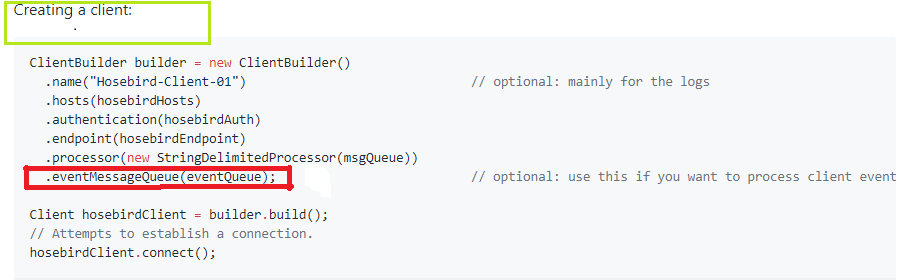
将代码粘贴到连接代码下方。此代码将通过客户端构建器创建一个twitter客户端。当我们使用msgQueue时,请勿复制红色的高亮代码,该代码用于eventMessageQueue。不需要。
第3步:使用引导服务器连接,以与上一节所述类似的方式创建生产者。
第4步:创建了Kafka生产者之后,就该将推文发送给Kafka了。从“创建客户端”代码下面给出的“ github twitter java”中复制while循环代码。粘贴在生产者代码下方。

现在,我们准备阅读Twitter上的推文。虽然,卡夫卡的制片人从一个主题中读取消息。因此,请在CLI上使用“ -create”命令创建指定的主题。另外,指定分区值和复制因子。
例如,
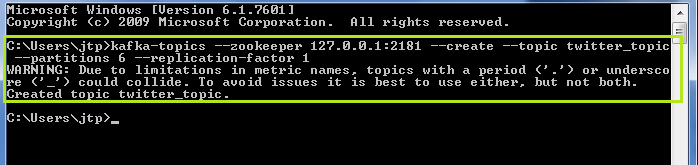
在这里,创建的主题“ twitter_topic”具有分区值6和复制因子1。最后,执行代码并在实际应用程序中体验Kafka。
创建Twitter客户端的完整代码如下:
package com.github.learnkafka;

import com.google.common.collect.Lists;
import com.twitter.hbc.ClientBuilder;
import com.twitter.hbc.core.Client;
import com.twitter.hbc.core.Constants;
import com.twitter.hbc.core.Hosts;
import com.twitter.hbc.core.HttpHosts;
import com.twitter.hbc.core.endpoint.StatusesFilterEndpoint;
import com.twitter.hbc.core.processor.StringDelimitedProcessor;
import com.twitter.hbc.httpclient.auth.Authentication;
import com.twitter.hbc.httpclient.auth.OAuth1;
import org.apache.kafka.clients.producer.*;
import org.apache.kafka.common.serialization.StringSerializer;
import org.slf4j.Logger;
import org.slf4j.LoggerFactory;

import java.util.List;
import java.util.Properties;
import java.util.concurrent.BlockingQueue;
import java.util.concurrent.LinkedBlockingQueue;
import java.util.concurrent.TimeUnit;

public class tweetproducer {
    Logger logger = LoggerFactory.getLogger(tweetproducer.class.getName());
    String consumerKey = "";//specify the consumer key from the twitter app
    String consumerSecret = "";//specify the consumerSecret key from the twitter app
    String token = "";//specify the token key from the twitter app
    String secret = "";//specify the secret key from the twitter app

    public tweetproducer() {}//constructor to invoke the producer function

    public static void main(String[] args) {
        new tweetproducer().run();
    }

    public void run() {
        logger.info("Setup");

        BlockingQueue<String> msgQueue = new
	LinkedBlockingQueue<String>(1000);//Specify the size accordingly.
        Client client = tweetclient(msgQueue);
        client.connect(); //invokes the connection function
        KafkaProducer<String, String> producer=createKafkaProducer();

        // on a different thread, or multiple different threads....
        while (!client.isDone()) {
            String msg = null;
            try {
                msg = msgQueue.poll(5, TimeUnit.SECONDS);//specify the time
            } catch (InterruptedException e) {
                e.printStackTrace();
                client.stop();
            }
            if (msg != null) {
                logger.info(msg);
                producer.send(new ProducerRecord<>("twitter_topic", null, msg), new Callback() {
                    @Override
                    public void onCompletion(RecordMetadata recordMetadata, Exception e) {
                        if(e!=null){
                            logger.error("Something went wrong", e);
                        }
                    }
                });
            }

        }//Specify the topic name, key value, msg

        logger.info("This is the end");//When the reading is complete, inform logger
    }

    public Client tweetclient(BlockingQueue<String> msgQueue) {

        Hosts hosebirdHosts = new HttpHosts(Constants.STREAM_HOST);
        StatusesFilterEndpoint hosebirdEndpoint = new StatusesFilterEndpoint();
        List<String> terms = Lists.newArrayList("India ");//describe
//anything for which we want to read the tweets.
        hosebirdEndpoint.trackTerms(terms);
        Authentication hosebirdAuth = new        OAuth1(consumerKey, consumerSecret, token, secret);
        ClientBuilder builder = new ClientBuilder()
                .name("Hosebird-Client-01")     // optional: mainly for the logs
                .hosts(hosebirdHosts)
                .authentication(hosebirdAuth)
                .endpoint(hosebirdEndpoint)
                .processor(new StringDelimitedProcessor(msgQueue));


        Client hosebirdClient = builder.build();
        return hosebirdClient; // Attempts to establish a connection.
 }
    public KafkaProducer<String, String> createKafkaProducer(){
 //creating kafka producer
//creating producer properties
        String bootstrapServers="127.0.0.1:9092";
        Properties properties= new Properties();
        properties.setProperty(ProducerConfig.BOOTSTRAP_SERVERS_CONFIG, bootstrapServers);
        properties.setProperty(ProducerConfig.KEY_SERIALIZER_CLASS_CONFIG, StringSerializer.class.getName());
        properties.setProperty(ProducerConfig.VALUE_SERIALIZER_CLASS_CONFIG, StringSerializer.class.getName());

        KafkaProducer<String, String> first_producer = new KafkaProducer<String, String>(properties);
        return first_producer;

    }
}
在上面的代码中,用户将指定consumerKey,consumerSecret密钥,令牌密钥以及秘密密钥。由于它是敏感信息,因此无法显示。从“ developer.twitter.com”复制密钥,然后粘贴到它们各自的位置。
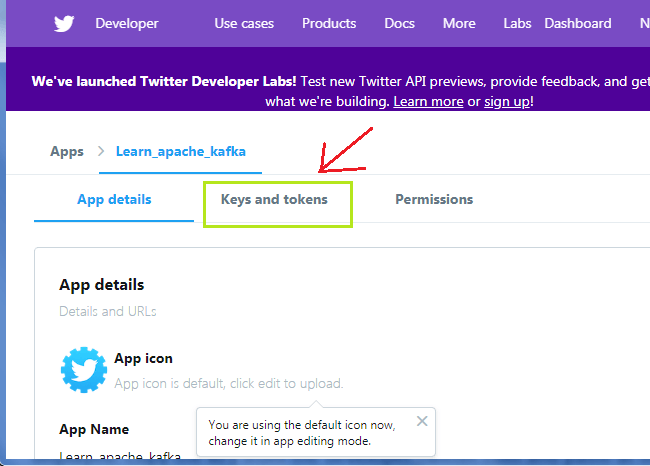
从“密钥和令牌”中复制密钥,然后粘贴代码。
上面代码的输出将显示为:
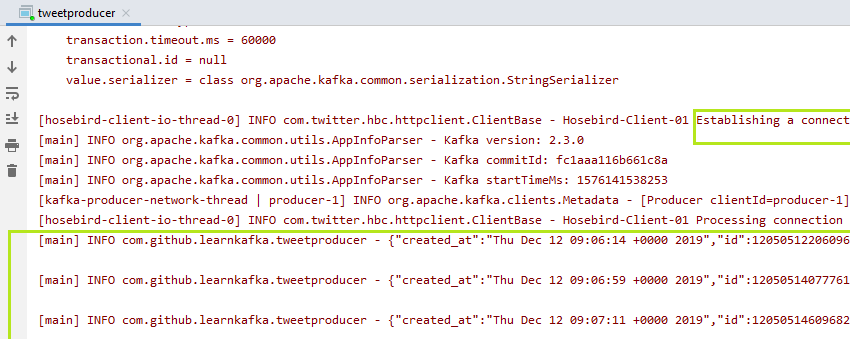
客户端与Hosebird建立连接。此后,我们可以看到“印度”上产生了太多推文。在任何指定的主题上发布一些推文,然后尝试。
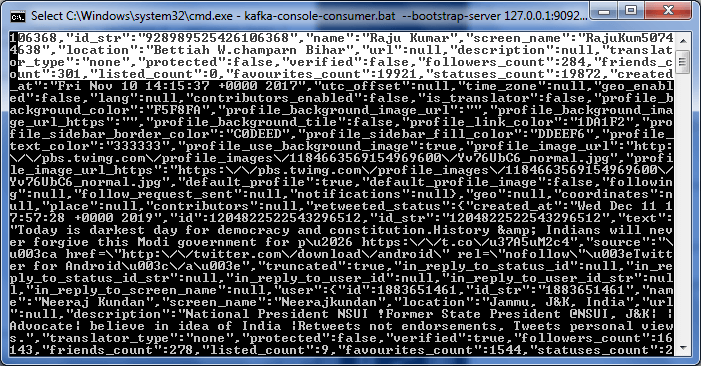
在CLI上尝试使用“ kafka-console-consumer -bootstrap-server 127.0.0.1:9092 -topic twitter_topic”命令。输出将与IntelliJ IDEA终端上的输出相同:
这样,我们可以创建一个真正的Twitter-Kafka-Producer,并将推文发送到Kafka。
评论前必须登录!
注册