 srcmini
本文概述
模板驱动的表单可用于许多应用程序,即登录,提交请求,下订单,输入数据等。
现在,让我们创建表单。按着这些次序:
新建项目
首先,使用以下命令创建一个名为angular-forms的新项目:
ng new angular-forms现在,使用以下命令转到项目文件夹。
cd angular-forms现在,使用Angular CLI命令ng generate class Hero生成一个名为Hero的新类:
ng generate class Hero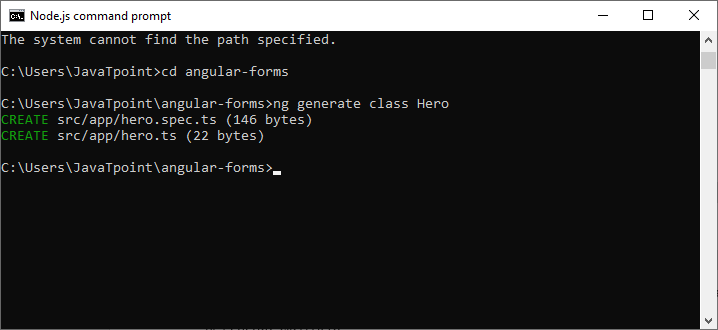
转到项目文件夹angular-forms,然后在app模块下打开hero.ts文件。编写以下代码:
export class Hero {
  constructor(
    public id: number, public name: string, public power: string, public alterEgo?: string
  ) {  }
}
TypeScript编译器会为每个公共构造函数参数生成一个公共字段,当你创建新英雄时,它将自动将参数的值分配给该字段。
在这里,alterEgo是可选的,构造函数可以忽略它。
创建一个表单组件
Angular表单由两部分组成:
- 基于HTML的模板
- 处理数据和用户的组件类
现在,使用以下命令生成一个名为HeroForm的新组件:
ng generate component HeroForm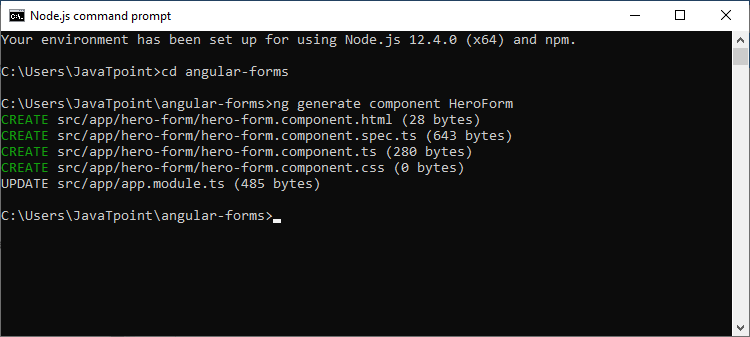
在hero-form.component.ts中写下以下代码
import { Component } from '@angular/core';
import { Hero }    from '../hero';
@Component({
  selector: 'app-hero-form', templateUrl: './hero-form.component.html', styleUrls: ['./hero-form.component.css']
})
export class HeroFormComponent {
  powers = ['Really Smart', 'Super Flexible', 'Super Hot', 'Weather Changer'];
  model = new Hero(18, 'Dr IQ', this.powers[0], 'Chuck Overstreet');
  submitted = false;
  onSubmit() { this.submitted = true; }
  // TODO: Remove this when we're done
  get diagnostic() { return JSON.stringify(this.model); }
}
修改app.module.ts文件
app.module.ts文件用于定义应用程序的根模块。模板驱动的表单驻留在它们自己的模块中。你需要在使用表单之前将FormsModule添加到应用程序模块的导入数组中。
在app.module.ts文件中使用以下代码:
import { NgModule }      from '@angular/core';
import { BrowserModule } from '@angular/platform-browser';
import { FormsModule }   from '@angular/forms';
import { AppComponent }  from './app.component';
import { HeroFormComponent } from './hero-form/hero-form.component';
@NgModule({
  imports: [
    BrowserModule, FormsModule
  ], declarations: [
    AppComponent, HeroFormComponent
  ], providers: [], bootstrap: [ AppComponent ]
})
export class AppModule { }
在这里,我们导入了FormsModule并将FormsModule添加到@NgModule装饰器中定义的导入列表中。这用于将应用程序访问所有模板驱动的表单功能,包括ngModel。
修改app.component.html文件
app.component.html用于托管新的HeroFormComponent。它是应用程序的根组件。在app.component.html中编写以下代码
<app-hero-form></app-hero-form>创建一个初始的HTML表单模板
在hero-form.component.html中使用以下代码
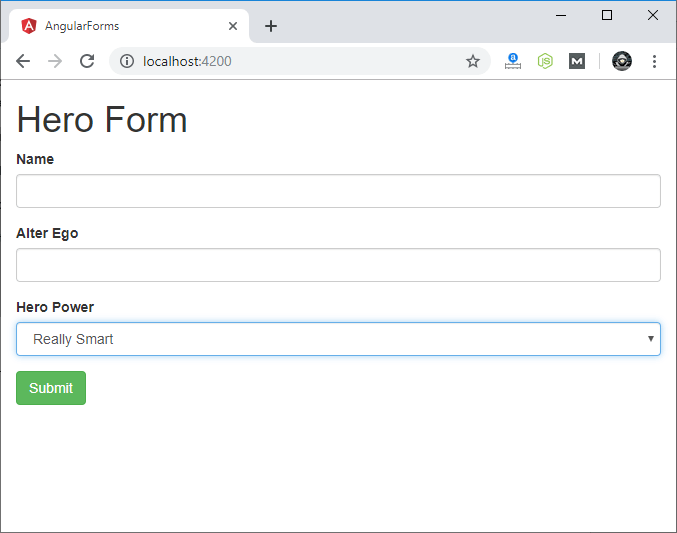
<div class="container">
    <h1>Hero Form</h1>
    <form>
      <div class="form-group">
        <label for="name">Name</label>
        <input type="text" class="form-control" id="name" required>
      </div>
      <div class="form-group">
        <label for="alterEgo">Alter Ego</label>
        <input type="text" class="form-control" id="alterEgo">
      </div>
      <button type="submit" class="btn btn-success">Submit</button>
    </form>
</div>
设置表格样式
打开style.css并使用以下代码导入引导文件。
@import url('https://unpkg.com/bootstrap@3.3.7/dist/css/bootstrap.min.css');使用* ngFor添加power列表
英雄表格可以从机构认可的固定power列表中选择power列表。在hero-form.component.html中的Alter Ego组下面立即使用以下HTML代码
<div class="form-group">
  <label for="power">Hero Power</label>
  <select class="form-control" id="power" required>
    <option *ngFor="let pow of powers" [value]="pow">{{pow}}</option>
  </select>
</div>
基本模板驱动的表单现已完成。你可以使用ng serve命令来运行项目。
输出:
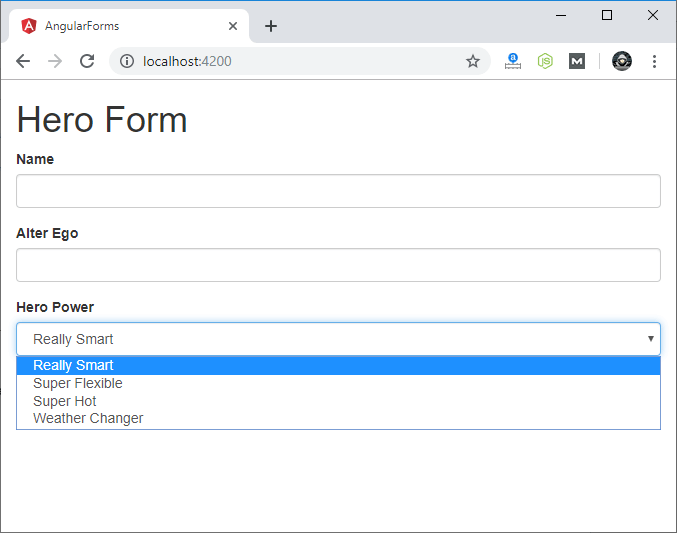
你可以在此处检查英雄的力量。
评论前必须登录!
注册